给节点套上CF的warp,彻底解决access denied error code 1020问题 |
您所在的位置:网站首页 › error code:1020 › 给节点套上CF的warp,彻底解决access denied error code 1020问题 |
给节点套上CF的warp,彻底解决access denied error code 1020问题
|
文章目录[隐藏] 前言 思路 条件 Warp 安装 安装前 安装中 Ubuntu 配置xray 我的xray配置文件 安装后 总结 前言最近的网络最热门的,应该当ChatGPT所属了,在IT开发者界更是:有担忧的,有兴奋的,有求知的,一时兴起万层浪,但是,也有很多小白连最基本的大门都没办法进来,因为流量太大了,已远远超过了ChatGPT的服务器所承受能力,这个访问量已大大超出了你的想像,所以请了一台流量高防大将:CloudFlare,先是真人human验证,再是IP验证,很多新人都对Access deniedAccess denied Error code 1020深有体会吧,今天就聊一下如何彻底地解决这个问题。 思路由于CF验证IP,咱们大陆的IP会access denied拒绝,很多海外节点也被拒绝了,因为咱们国人多,热度高,流量大,所以第一排除的就是咱们中国及使用代理最多的中国IP。 思路就是套用CloudFlare官方自己的Warp,它对自己人还是友好放行的原理。思路跟解锁Netfilx原生IP一样。 条件 自己能配置的节点 套的IP未被CF自己封 Warp 什么是Warp呢,请查看官方介绍吧 官方地址:https://1.1.1.1 
用一句话介绍就是,私人的私人代理,如果你也想使用,或者升级到Warp+,推荐连接,我可能获得1G流量 安装 安装前 curl chat.openai.com直接显示经典的error code:1020错误,说明我能服务器本身就无法访问ChatGPT,所以你当节点,那也肯定是跑不了1020的了 
web Access denied You do not have access to chat.openai.com. The site owner may have set restrictions that prevent you from accessing the site. Ray ID: 795a3ced8bfa934a Timestamp: 2023-02-07 06:58:35 UTC Your IP address: 146.5X.x.x. Requested URL: chat.openai.com/auth/login Error reference number: 1020 Server ID: FL_443F37 User-Agent: Mozilla/5.0 (Windows NT 10.0; Win64; x64) AppleWebKit/537.36 (KHTML, like Gecko) Chrome/109.0.0.0 Safari/537.36exe 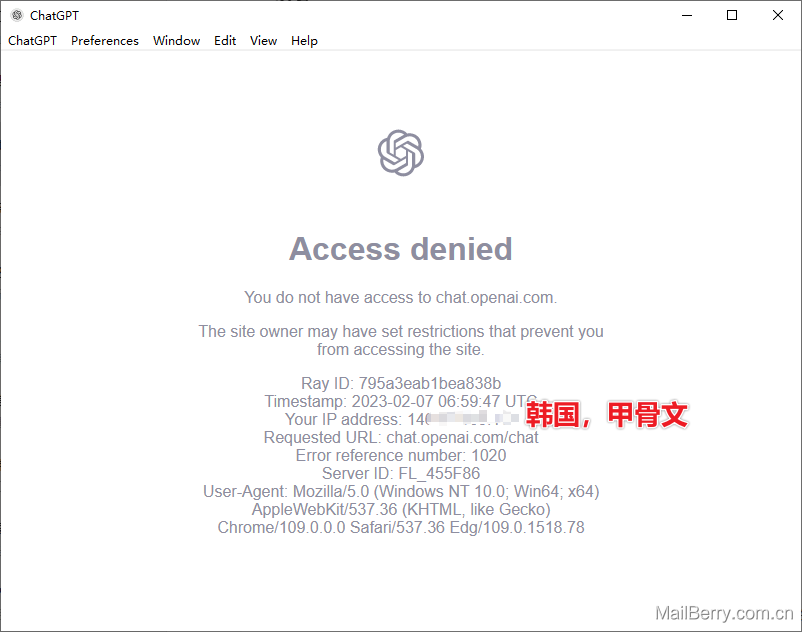
我的是甲骨文韩国首尔的服务器,证实是无法使用的了,而且我三台试了,都是1020错误代码。估计是封IP段 安装中第一,先给服务上个快照,折腾坏了也能恢复折腾前的状态 第二,安装warp 官网教程:https://pkg.cloudflareclient.com/install UbuntuFirst, install the repository's GPG key:curl https://pkg.cloudflareclient.com/pubkey.gpg | sudo gpg --yes --dearmor --output /usr/share/keyrings/cloudflare-warp-archive-keyring.gpg Then add the repository to your machine's apt sources:echo "deb [arch=amd64 signed-by=/usr/share/keyrings/cloudflare-warp-archive-keyring.gpg] https://pkg.cloudflareclient.com/ $(lsb_release -cs) main" | sudo tee /etc/apt/sources.list.d/cloudflare-client.listT Finally, update the APT cache:sudo apt updateand now packages from this repository can be installed directly with APT! 官方只是讲到GPG及库更新。接下来,实操 1,为库安装GPG Key curl https://pkg.cloudflareclient.com/pubkey.gpg | sudo gpg --yes --dearmor --output /usr/share/keyrings/cloudflare-warp-archive-keyring.gpg2,添加源到库 echo "deb [arch=amd64 signed-by=/usr/share/keyrings/cloudflare-warp-archive-keyring.gpg] https://pkg.cloudflareclient.com/ $(lsb_release -cs) main" | sudo tee /etc/apt/sources.list.d/cloudflare-client.list3,update APT apt update #管理权限直接使用这个更新 sudo apt update #如果不是管理员账号下,使用这个4,安装Warp apt install cloudflare-warp5,注册Warp 运行命令给设备注册 warp-cli register6,打开代理模式 warp-cli set-mode proxy7,连接Warp warp-cli connect8,查验 curl ifconfig.me --proxy socks5://127.0.0.1:40000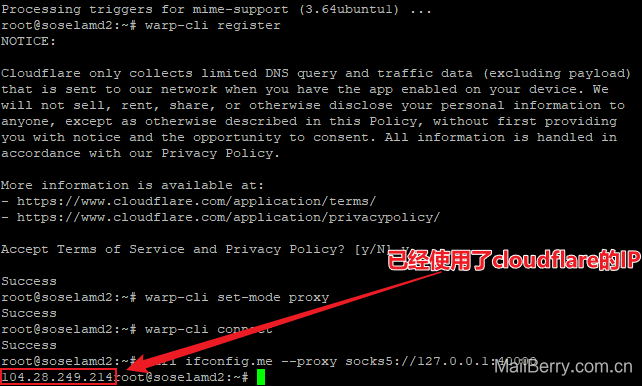
显示IP地址为CloudFlare的代理IP地址了 
再测试不使用socks5时候还是1020错误代码,第二条命令带上socks5,没有1020错误代码提示了。 至此 说明我这能韩国服务器套上了CloudFlare的Warp节点,是能正常访问chat.openai.com了,接下来了就是配置节点的分流路由规则了 配置xray登录x-ui控制后台——面板设置——xray相关设置——xray配置模板——复制出来,备份好 在高亮文体编辑器里修改(可选) 1,在"outbounds"的代码块添加出站规则 
2,在"routing"的代码块添加路由规则,使用域名chat.openai.com及ip138.com(为了测试是否生效)的规则 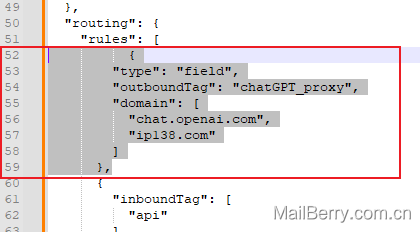
3,保存配置——重启面板 我的xray配置文件如果你不想自己手动修改xray配置模板,或者担心修改错误,可以直接使用我的配置文件 { "api": { "services": [ "HandlerService", "LoggerService", "StatsService" ], "tag": "api" }, "inbounds": [ { "listen": "127.0.0.1", "port": 62789, "protocol": "dokodemo-door", "settings": { "address": "127.0.0.1" }, "tag": "api" } ], "outbounds": [ { "protocol": "freedom", "settings": {} }, { "tag": "chatGPT_proxy", "protocol": "socks", "settings": { "servers": [ { "address": "127.0.0.1", "port": 40000 } ] } }, { "protocol": "blackhole", "settings": {}, "tag": "blocked" } ], "policy": { "system": { "statsInboundDownlink": true, "statsInboundUplink": true } }, "routing": { "rules": [ { "type": "field", "outboundTag": "chatGPT_proxy", "domain": [ "chat.openai.com", "ip138.com" ] }, { "inboundTag": [ "api" ], "outboundTag": "api", "type": "field" }, { "ip": [ "geoip:private" ], "outboundTag": "blocked", "type": "field" }, { "outboundTag": "blocked", "protocol": [ "bittorrent" ], "type": "field" } ] }, "stats": {} } 安装后1,测试ip138.com 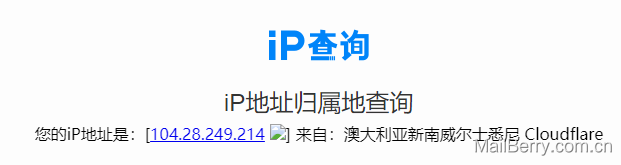
已经是cloudflare的IP地址了。地址和上“安装中——第8条”的:curl ifconfig.me --proxy socks5://127.0.0.1:40000结果是一至的 2,打开,chat.openai.com ,见证奇怪的时刻 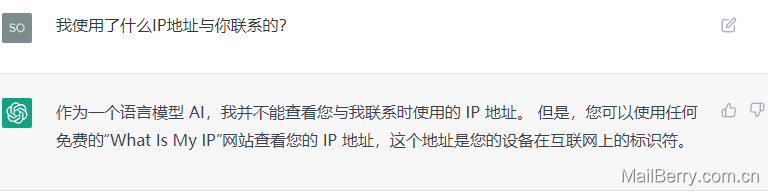
尽管未能证明我使用的IP地址,但确实是能使用ChatGPT了,至此,完成! 要考虑一下做视频教学了 总结方法是从解锁Netflix得到的启示,套了Warp就能解锁CloudFlare对你的节点的封锁了,而且现在CloudFlare拒绝访问的IP限制还不是很严格的,从而这个方法可以拯救你节点。 总结思路:套用warp——设置域名分流规则 |
【本文地址】